You can get a genuine performance brake upgrade for under $500 on most cars and trucks. The most reliable route is a matched pad-and-rotor kit for one axle, usually the front, since that’s where most of your stopping power comes from. Before you spend a dollar, do three things:
- Verify fitment against your exact year, make, model, and trim.
- Pick a pad compound that matches how you actually drive, not how you wish you drove.
- Buy a matched kit that includes hardware and shims rather than piecing parts together.
If you want a shortcut through the fitment guesswork, Ozkonickustomz sources vetted, fit-verified kits directly from manufacturers, which removes most of the risk that trips up first-time buyers.
Key Takeaways
A staged approach, pads and rotors first, then fluid and hoses, then a bigger hardware upgrade only if still needed, delivers more real-world stopping performance per dollar than jumping straight to a big brake kit.
| Point | Details |
|---|---|
| Fitment beats price | Confirm your exact year, make, model, and trim before comparing prices between kits. |
| Match compound to use | Choose ceramic for quiet daily driving, semi-metallic or load-rated compounds for towing or track use. |
| Stage your upgrades | Start with pads and rotors, add fluid and stainless hoses next, save a big brake kit for last. |
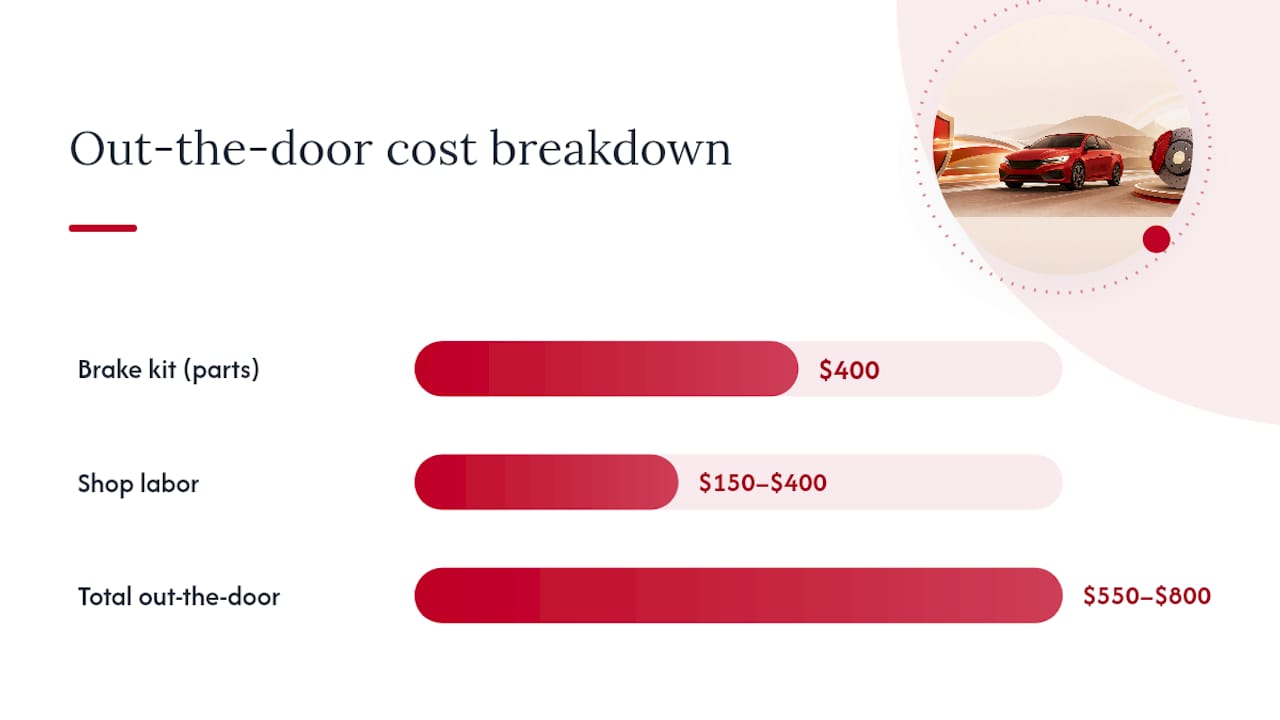
| Budget the full install | Plan for $550 to $800 out-the-door once labor, fluid, and bed-in time are included. |
| Buy from a fitment-verified source | Ozkonickustomz sources kits directly from vetted manufacturers and confirms fitment before shipping. |
Table of Contents
- What’s Actually in a Performance Brake Kit Under $500
- How Do You Pick the Right Brake Kit for Your Car?
- What Should You Actually Buy on a $500 Budget?
- What Will Installation Actually Cost You?
- Why Fitment Verification and Direct Sourcing Matter
- What Do Owner Reviews Actually Tell You?
- The Conventional Wisdom on Brake Upgrades Gets This Backward
- Get a Fit-Verified Brake Kit Without the Guesswork
- Sources
What’s Actually in a Performance Brake Kit Under $500
A sub-$500 kit almost always covers one axle: a pair of rotors, a set of pads, and the hardware or shims that keep everything from rattling. Front kits dominate this price range because front brakes handle most of the stopping force under hard braking, so upgrading there gives you the biggest return per dollar.
What should you actually expect from the upgrade? Realistic gains include better initial bite, less fade during repeated hard stops, and a firmer pedal feel. What you shouldn’t expect is track-day heat capacity or towing-grade durability from a $400 kit, since those jobs demand more thermal mass than a street kit is built to handle.
Compound choice drives most of the personality difference:
- Ceramic pads run quieter and produce less brake dust, but they can feel slightly less aggressive on that first stab of the pedal.
- Semi-metallic pads bite harder and resist fade better under load, at the cost of more noise and faster rotor wear.
- Slotted or drilled rotors clear gas and dust faster during hard use, though drilled rotors carry a higher risk of cracking over time compared to smooth or slotted-only designs.
Pro Tip: If your daily driving is mostly commuting with the occasional mountain pass or track day, buy the quieter ceramic pad and save the aggressive semi-metallic compound for a car you actually track.
How Do You Pick the Right Brake Kit for Your Car?
Five checks separate a good purchase from an expensive mistake.
- Confirm your exact application. Cross-reference your VIN or trim against the seller’s fitment listing. A “fits most 2015-2020 half-ton trucks” listing is a red flag, not a convenience.
- Check wheel and caliper clearance. Some kits, especially anything branded a big brake kit, require larger wheel diameters or different offsets to clear the new hardware.
- Match the pad compound to your use case. Daily commuting favors ceramic. Towing or hauling favors a load-rated compound. Track use favors a compound built for sustained heat, not comfort.
- Choose rotor style based on your maintenance appetite. Coated smooth rotors resist rust and last longer with less fuss. Slotted or drilled rotors help with heat and gas buildup but ask more of you in inspection frequency.
- Confirm the warranty, the included hardware, and the return policy before you check out. A kit with no clear return window or vague fitment language usually means the seller expects returns.
Pro Tip: Call or message the seller with your exact VIN before ordering. A seller who can confirm fitment in writing is a seller worth buying from; one who can’t should make you nervous.
If you’re chasing a specific symptom, like a soft pedal or a burning smell after a mountain descent, diagnosing brake fade first will tell you whether you need new pads or a full rethink of your setup.
What Should You Actually Buy on a $500 Budget?
The best-value purchase in this price range is a matched front-axle rotor and pad kit with hardware included. Piecemeal parts save a little on paper but often cost more once you’re hunting for the right shims or an adapter bracket you didn’t know you needed.
How do you decide between rotor styles? If your driving involves repeated hard stops, slotted or drilled rotors paired with a semi-metallic pad help manage heat. If you’re mostly commuting, a coated smooth rotor with a ceramic pad will outlast the flashier option and cost less to maintain.
A sensible staged upgrade path looks like this:
- Stage one: better pads and rotors, matched as a kit.
- Stage two: stainless steel brake hoses and a fresh high-temperature fluid flush, since old fluid absorbs moisture and lowers your boiling point over time.
- Stage three: a caliper or big brake kit upgrade, but only if stages one and two still leave you short on heat capacity.
That third stage is where most budget-conscious buyers should stop. Big brake kits look aggressive behind a wheel, but for street driving, pads and fluid usually deliver more real-world benefit than a hardware swap that mainly changes your car’s silhouette. Watch for sales at warehouse retailers, and skip any “universal” kit that requires cutting, drilling, or custom bracket fabrication to fit. If a listing needs a disclaimer about “minor modification,” walk away.
What Will Installation Actually Cost You?
Installing a front-axle kit yourself typically takes one to three hours if you’ve done basic brake work before. Both axles run two to five hours. Shop labor varies by region and vehicle, but budget for it if your car has an electronic parking brake or unusual caliper hardware.
Three steps matter beyond the bolt-on swap:
- Bleed the system and change the fluid if it’s more than two years old or you’re adding a hose upgrade.
- Bed in the new pads and rotors with a proper break-in sequence, usually 15 to 20 moderate stops from highway speed, before you drive normally.
- Torque everything to spec and double-check caliper hardware, since a loose bracket causes noise and uneven wear within weeks.
Hand this one to a shop if your vehicle has an integrated electronic parking brake, unusual ABS calibration, or a brake-by-wire system. Those setups can require a scan tool reset after service.
A realistic out-the-door number: a $400 kit plus $150 to $400 in shop labor puts you at $550 to $800 total, even though the parts themselves stayed under $500.
Why Fitment Verification and Direct Sourcing Matter
The biggest risk in this price range isn’t a bad pad compound. It’s a kit that doesn’t actually fit your car once it arrives.
Ozkonickustomz sources parts directly from vetted manufacturers specifically to cut down on counterfeit components and fitment mismatches, two problems that plague budget brake shopping online. That matters because a brake kit is one of the few automotive parts where a fitment error isn’t just annoying, it’s a safety issue.
Fitment guesswork is the single most common reason budget brake orders end up returned. A kit that requires “minor trimming” to fit isn’t a deal. It’s a liability with a lower price tag.
When you order, give the seller your VIN, current mileage, and any prior brake modifications. A seller worth trusting will:
- Confirm exact fitment before shipping, not after you’ve already installed it.
- Explain what’s included (hardware, shims, instructions) without you having to ask.
- Offer a clear return path if the parts don’t match your application.
For deeper technical background on why heat management and component choice matter beyond just swapping pads, the brake safety and performance guide breaks down the mechanics in plain language.
What Do Owner Reviews Actually Tell You?
Reviews for budget brake kits cluster around three recurring themes, and all three matter more than star ratings alone.
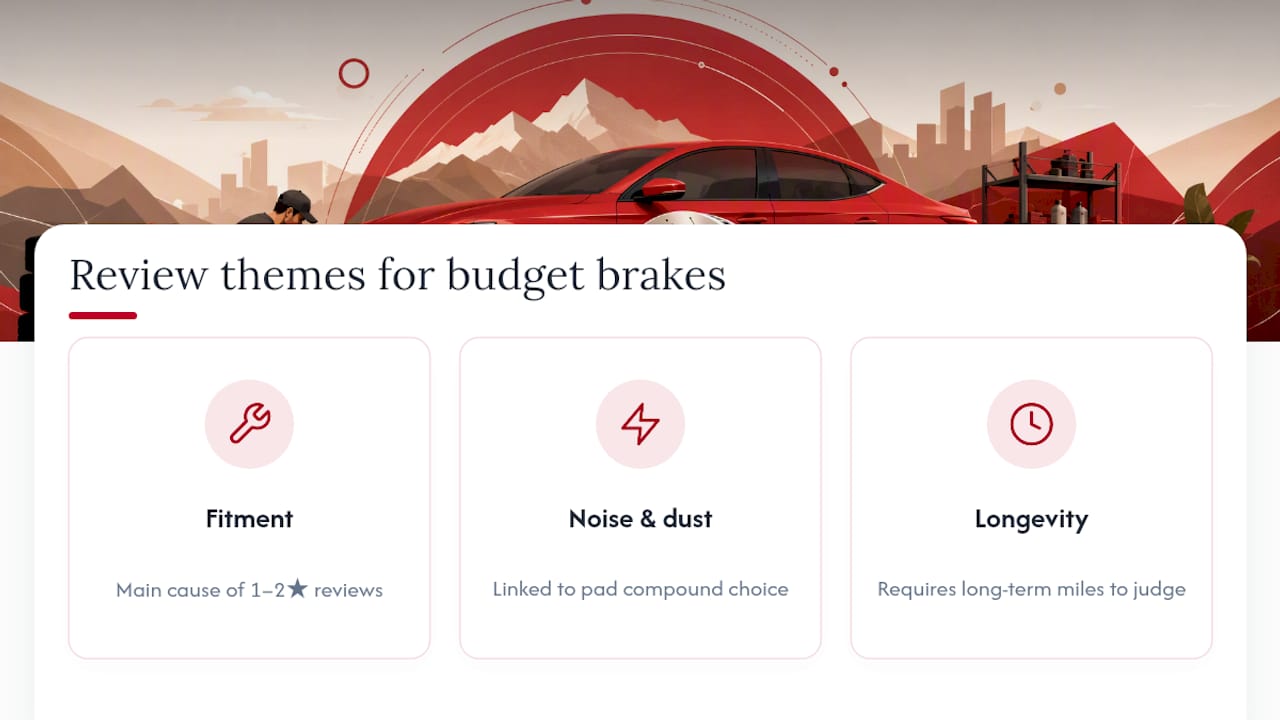
Fitment complaints dominate negative reviews. When a kit gets one or two stars, it’s almost always because a part didn’t clear a caliper bracket or the rotor bolt pattern didn’t match, not because the pad compound performed poorly. This confirms what the fitment-first buying advice above already tells you: verify before you order, because most bad reviews are fitment failures, not product failures.
Noise and dust complaints track directly to compound choice. Buyers who complain about squealing or dusty wheels almost always bought a semi-metallic pad expecting ceramic-like quiet. Reading the compound description carefully, not just the star rating, tells you more than the review score itself.
Longevity reviews take time to mean anything. A kit with glowing reviews after 30 days tells you about initial bite and noise. It doesn’t tell you about rotor warping or pad wear at 20,000 miles. Weight reviews with mileage or time-in-service noted more heavily than reviews written the week of installation.
The practical takeaway: read for the reason behind a rating, not the star count itself. A three-star review that says “great pads, wrong bolt pattern for my trim” is actually a five-star product with a fitment miss, and that distinction changes what you should do about it.
The Conventional Wisdom on Brake Upgrades Gets This Backward
Most advice aimed at budget-conscious drivers starts with the flashiest option: a big brake kit with a red caliper and a bigger rotor visible through the wheel spokes. That’s backward. The research on this is consistent. Pads, fluid, and hoses solve the actual problem, fade and inconsistent pedal feel, for a fraction of the cost of a full hardware swap.
What’s overrated is rotor diameter. What’s underrated is fluid age. A five-year-old brake fluid reservoir will hurt your pedal feel more than an extra inch of rotor will help it, and almost nobody checks fluid condition before shopping for parts.
If you take one thing from this guide, prioritize fitment verification over spec-sheet chasing. A perfectly matched pad-and-rotor kit that fits correctly will outperform a more aggressive kit that requires workarounds to install. Buy the boring, correct part before you buy the exciting, uncertain one.
Get a Fit-Verified Brake Kit Without the Guesswork
Ozkonickustomz exists for exactly the buyer this article is written for: someone who wants real stopping power under $500 without gambling on a listing that says “fits most models.” Every kit is sourced directly from vetted manufacturers and checked for fitment before it ships, so you’re not the one discovering a bolt pattern mismatch after the box arrives.
If you’re staging your upgrade the way this guide recommends, pads and rotors first, pair your brake kit with proven parts and support built for the exact way you drive, whether that’s daily commuting, towing, or weekend track days. Browse the current brake kit selection, enter your vehicle details, and get a fitment confirmation before you check out. That’s the whole process, and it’s the fastest way to know your $500 is buying a kit that actually fits.