The upgrades that move the needle most on a 1970 Chevy C10 fall into six categories: suspension, engine and powertrain, brakes and steering, cooling and wiring, wheels and tires, and interior/exterior cosmetics. Get those six right, in that order, and you turn a 55-year-old work truck into something that drives, stops, and looks like it was built yesterday.
Here’s the one-line playbook for each:
- Suspension: Swap tired leaf springs and factory control arms for a coilover or air-ride setup that matches your ride height goals.
- Engine/powertrain: An LS swap, especially a 5.3L, delivers the best power-per-dollar without exotic fabrication.
- Brakes/steering: Convert to four-wheel disc brakes and add power steering before you touch anything else that adds weight or speed.
- Cooling/wiring: Replace the factory radiator and wiring harness together. Modern engines and electronics both hate factory-era components.
- Wheels/tires: Pick wheel sizes and backspacing based on your suspension choice, not the other way around.
- Interior/exterior cosmetics: Save these for last unless you’re chasing show points. They don’t affect drivability.
Pro Tip: Before you spend a dollar on parts, spend a weekend under the truck with a flashlight. Frame condition and cab mounts dictate everything else you can safely do, and this single inspection prevents more wasted money than any single upgrade decision.
Ozkonic Kustomz sources wiring kits, air-ride components, and fitment-guaranteed hardware for exactly this kind of build. Wilwood remains the standard reference for C10 brake conversions, and 1970 C10 valuation data gives you a real budget ceiling before you start writing checks.
Key Takeaways
Sequencing matters more than any single part: fix the frame, upgrade suspension and brakes, then add power, and every dollar spent afterward works harder because of it.
| Point | Details |
|---|---|
| Inspect before you buy | Check frame rails, cab mounts, and floor pans first; structural issues undermine every later upgrade. |
| Sequence upgrades by risk | Suspension and brakes come before engine power increases, not after. |
| Budget the hidden systems | Fuel delivery, cooling, and wiring upgrades often cost more than builders initially plan for. |
| Confirm fitment every time | Year-specific kits matter across the 1967 to 1972 C10 range; measure before ordering. |
| Source from fitment-guaranteed vendors | Ozkonic Kustomz backs wiring, air-ride, and fitting components with compatibility support to avoid costly returns. |
Table of Contents
- How Do You Inspect a 1970 C10 Before Planning Upgrades?
- What Suspension Upgrades Work Best on a 1970 C10?
- Should You LS Swap Your 1970 C10, and Which Engine?
- Which Transmission and Driveshaft Setup Matches Your New Engine?
- What Brake and Steering Upgrades Do Lowered, Modified C10s Need?
- What Wheel and Tire Sizes Fit a 1970 C10 Without Rubbing?
- Which Exhaust and Intake Setup Fits Your Engine Choice?
- What Cooling, Fuel, and Wiring Upgrades Does Higher Power Require?
- How Do You Modernize Your C10’s Interior and Exterior Without Losing Value?
- What Does a Realistic Budget and Timeline Look Like?
- How Do You Confirm Fitment Before Ordering Parts?
- What Do Experienced Builders Say About LS Swap Clearance Issues?
- Why Suspension and Frame Work Should Come Before Horsepower
- Where to Buy Fitment-Guaranteed Parts for Your 1970 C10
- Sources
How Do You Inspect a 1970 C10 Before Planning Upgrades?
Start under the cab, not under the hood. Frame rails and cab mounts on a 55-year-old truck take more abuse than anything else on the vehicle, and a rotted mount or cracked frame rail will undermine every dollar you spend on suspension or power later. Buyer’s guide data on the C10 confirms that frame condition and cab integrity matter more than trim level or original mileage when it comes to build viability, since sheet metal and mechanical parts are widely available and frames are not.
Work through this checklist before you order a single part:
- Inspect the frame rails directly under the cab and bed for rust-through, especially near the rear spring hangers.
- Check cab mounts for crumbling rubber or rusted mounting bolts, a common failure point on trucks that sat outside for decades.
- Pull back carpet or bed liner to look at floor pans, which rust from the inside out and often hide damage until it’s too late.
- Examine the steering box mounting area on the frame rail, since this spot takes constant stress and corrodes quietly.
- Look at every suspension mounting point, front and rear, for elongated bolt holes or weld cracks.
- Trace the rust-prone seams around the cab corners, rocker panels, and bed-to-cab gap.
Once the structure checks out, define your build goal before you buy anything. A daily-driver build prioritizes reliability and ride comfort. A drag or track build chases power-to-weight and traction. A restomod balances both. A show build prioritizes fit, finish, and originality-adjacent details that judges notice. Each goal changes which upgrades justify their cost, so pick one and let it filter every purchase decision that follows.
Pro Tip: Measure twice before you buy once. Structural repairs and fitment-critical dimensions, like frame width and steering box location, should be locked in before you order suspension or engine parts, because those measurements determine which kits will actually bolt up.
What Suspension Upgrades Work Best on a 1970 C10?
Suspension is where most 1970 Chevy C10 upgrades either pay off immediately or create years of frustration. Four main paths exist, and each trades ride quality against complexity and cost differently.
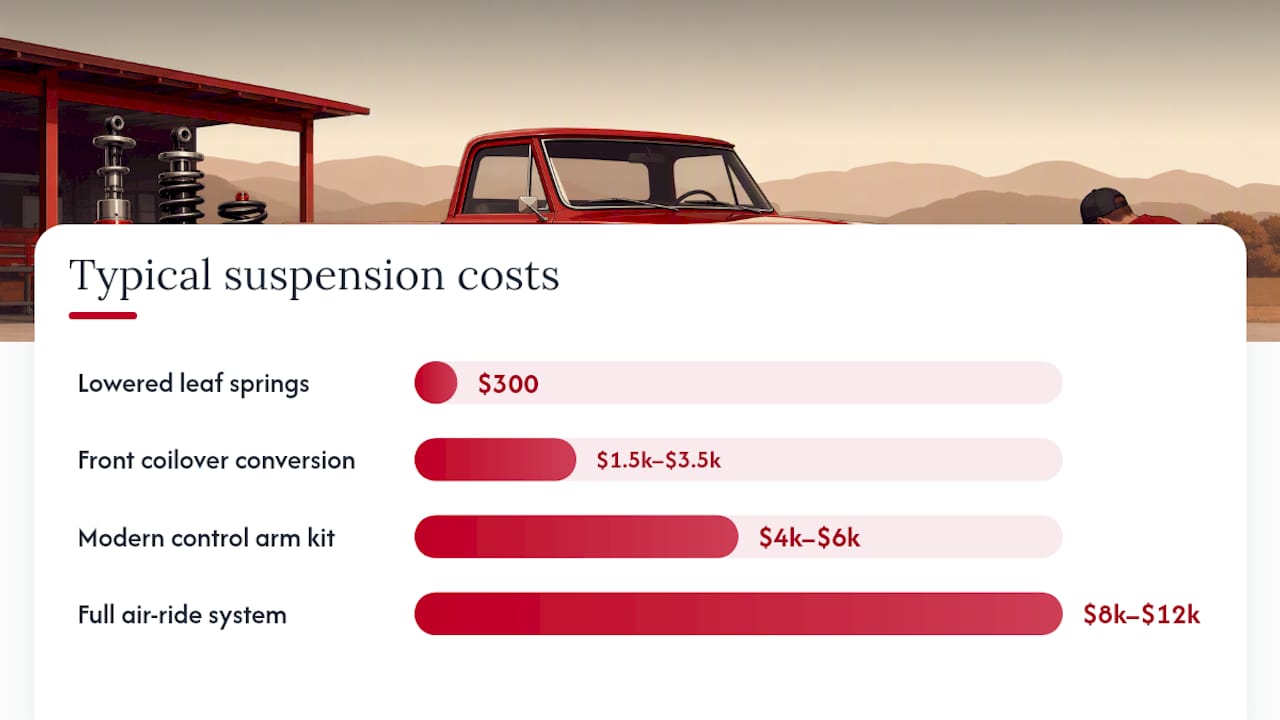
Lowered leaf springs are the cheapest entry point. Drop shackles or de-arched leaf packs bring the rear down a few inches without touching geometry, and most owners can install them in a weekend. Ride quality stays close to stock, which means acceptable but not great.
Front coilover conversions replace the factory coil springs and shocks with adjustable coilover units, usually paired with tubular control arms. This is the sweet spot for most restomod builds: better ride quality, adjustable ride height, and a noticeable handling improvement, all without the complexity of a full frame modification.
Modern control arm kits go a step further, correcting factory geometry issues that plagued the 1967 to 1972 C10 generation from the start. These kits improve camber curves and reduce bump steer, which matters more once you’ve added power and want the truck to actually turn where you point it.
Full air-ride systems sit at the top of the complexity and cost scale. They deliver the widest ride height range, from slammed to stock height at the push of a button, but they require air tanks, compressors, and lines routed through the frame and bed. Builders converting to air ride often lean on components like Air Lift hardware for the compressor and bag systems, since compatibility with the 1967 to 1972 chassis is well documented.
| Suspension Type | Ride Quality | Install Complexity | Typical Cost Range |
|---|---|---|---|
| Lowered leaf springs | Stock-like | Low (weekend DIY) | $300 |
| Front coilover conversion | Good, adjustable | Moderate | $1,500–$3,500 |
| Modern control arm kit | Very good, corrected geometry | Moderate to high | $4,000–$6,000 |
| Full air-ride system | Excellent, variable | High (shop recommended) | $8,000–$12,000 |
Fitment tied to the 1967 to 1972 chassis matters because these trucks share a body style but not every component is interchangeable year to year. Frame width, steering box mounting, and crossmember shape shifted slightly across the run, so a kit marketed as “67 to 72 fitment” isn’t automatically a guarantee for your specific 1970 truck. Always cross-check part numbers against your VIN-decoded chassis specs.
Whichever suspension route you choose, pair it with a brake upgrade and a wheel alignment at minimum. Lowering the truck without upgrading brakes changes weight transfer under hard stops, and skipping an alignment after any suspension change is the fastest way to chew through a new set of tires.
- Choose leaf springs if your budget is under $1,000 and you want a quick weekend improvement.
- Choose coilovers if you want the best balance of ride quality, adjustability, and cost for a restomod.
- Choose air ride if stance flexibility matters more to you than budget or install time.
Should You LS Swap Your 1970 C10, and Which Engine?
For most 1970 Chevy C10 owners chasing real performance upgrades, an LS swap delivers more power per dollar than any factory-based engine build. The debate between a 5.3L and a 6.0L comes down to budget, intended use, and how much fabrication you’re willing to take on.
The 5.3L wins on cost and simplicity. It’s smaller, lighter, and easier to source from junkyard trucks and SUVs, and it clears factory-adjacent steering and exhaust components more easily than a larger displacement LS. Community build threads consistently report builders favoring the 5.3L specifically for cost and clearance reasons, not just raw output. Veteran builders often argue a 5.3L with a mild cam and quality headers offers a better value-for-power starting point than jumping straight to a bigger, pricier engine.
The 6.0L brings more displacement and easier future power gains, but it typically costs more to source, weighs slightly more, and can tighten clearances around the steering shaft and oil pan depending on your mount kit. If your build goal includes serious future power ambitions, like a supercharger down the road, the 6.0L gives you more headroom to grow into.
An LS swap doesn’t stop at the engine. Budget for these supporting systems from day one:
- Oil pan: A rear-sump or dedicated swap pan matched to your truck year avoids crossmember and steering interference.
- Headers: Long-tube or shorty options exist specifically to clear steering shafts and brake boosters on C10 chassis.
- Fuel system: LS engines need higher fuel pressure than factory small-blocks, which usually means an in-tank pump upgrade.
- Cooling: Factory radiators can’t handle LS output; plan on an aluminum radiator and electric fans.
- ECU and harness: A standalone harness simplifies wiring versus adapting a donor vehicle’s full computer system.
- Alternator: LS-specific alternator brackets and wiring differ from factory small-block setups.
- Transmission: Your engine choice determines which transmissions bolt up without an adapter.
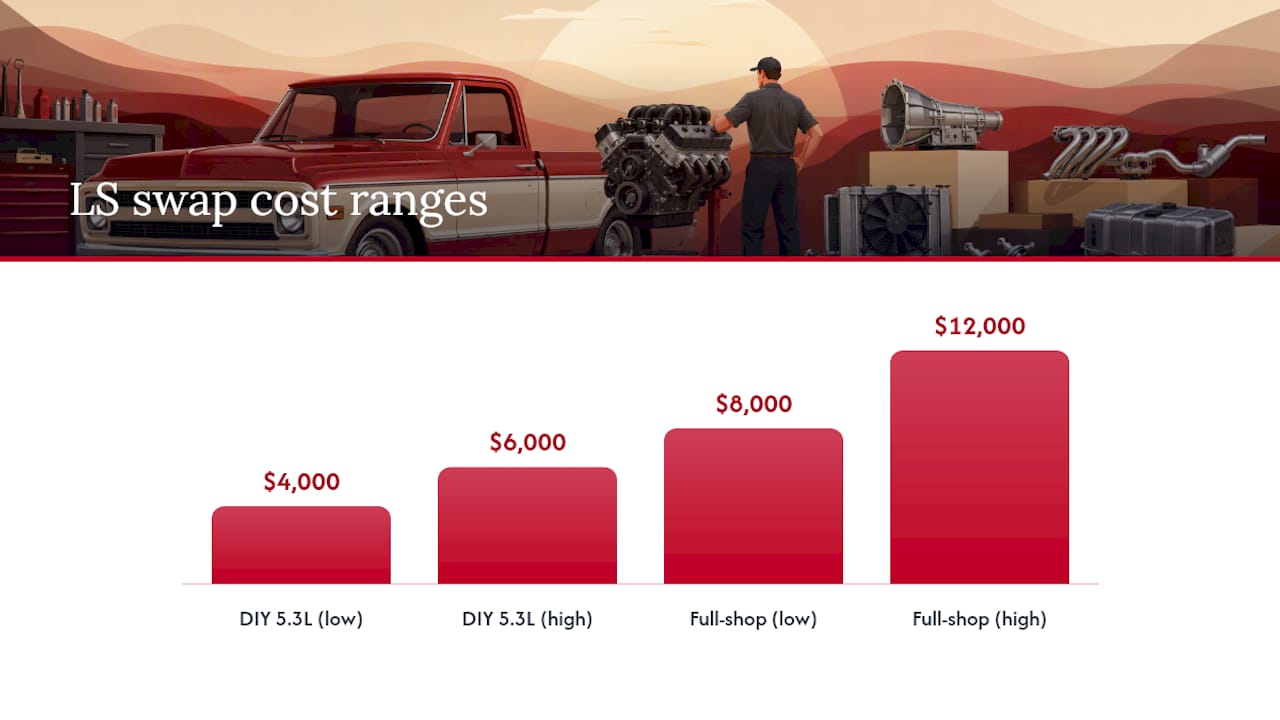
A budget 5.3L swap using a used engine, a mount kit, a standalone harness, headers, and a fuel system upgrade commonly runs $4,000 to $6,000 as a DIY build, and full-shop installs of the same package typically land between $8,000 and $12,000. Crate LS3 builds with fresh long blocks and premium accessories push well beyond that.
- Confirm oil pan clearance against your specific truck year before ordering a mount kit.
- Verify header routing around the steering shaft and brake booster.
- Budget for a standalone wiring harness rather than trying to adapt a donor computer.
- Plan the fuel system upgrade as a separate line item, not an afterthought.
- Confirm transmission compatibility before finalizing your engine choice.
Fitment differences between C10 model years mean oil pan clearance, header routing, and steering shaft interference require year-specific mount and swap kits rather than generic “fits all C10” listings. Ozkonic Kustomz breaks down these exact clearance issues in its C10 LS swap parts guide, which is worth reading before you commit to a mount kit.
Which Transmission and Driveshaft Setup Matches Your New Engine?
Your transmission choice depends on how much power you’re putting behind it and whether you want to shift gears yourself. For a mild 5.3L swap, a 4L60E handles the power comfortably and remains the most common automatic pairing in budget builds. Higher-output engines, especially anything approaching 400 horsepower or more, push builders toward a 4L80E or a heavily built 4L60E to avoid premature failure. Manual transmission fans typically land on a T56, which handles serious power and gives that six-speed shift feel that pairs well with a restomod’s driving character.
Whatever transmission you choose changes your driveshaft length and may require crossmember modification, since LS-based transmissions rarely share exact dimensions with the original small-block and Turbo 350 or 400 combos these trucks came with.
- Measure driveshaft length only after the engine and transmission are fully mounted and torqued in place.
- Never cut or estimate driveshaft length before final engine and transmission position is confirmed.
- Have the driveshaft professionally shortened and balanced; guessing on this step creates vibration and safety risks at highway speed.
- Expect crossmember fabrication or relocation when swapping from a factory transmission to an LS-compatible unit.
- Reconsider your rear differential gearing if your new engine’s power band or tire size has changed significantly from stock.
Pro Tip: Mock up the entire drivetrain, engine, transmission, and crossmember, before you order a driveshaft. Shops that skip this step end up cutting a shaft twice, and that second cut always costs more than doing it right the first time.
If you’ve changed tire diameter as part of a wheel upgrade, or added significant power, a gear ratio change in the rear differential keeps your engine in its usable power band instead of lugging at highway speed or over-revving around town.
What Brake and Steering Upgrades Do Lowered, Modified C10s Need?
Every 1970 Chevy C10 that gains power or drops ride height needs a brake and steering upgrade to match. Skipping this step is the single most common safety mistake in restomod builds, and it’s avoidable with a handful of well-documented upgrades.
Front disc brake conversions are close to mandatory on any build adding more than mild power. Wilwood’s C10 brake catalog documents caliper and rotor sizing options specifically matched to C10 spindles, and larger rotor diameters pair well with bigger wheel packages since they fill more of the wheel’s inner diameter. Rear disc conversions follow the same logic for trucks doing serious highway driving or towing.
Once you’ve upgraded front brakes, check your master cylinder sizing and proportioning valve. A master cylinder designed for drum brakes all around won’t deliver correct pedal feel or brake bias once the fronts go to disc, and an adjustable proportioning valve lets you dial in front-to-rear balance as your build evolves.
Power steering upgrades matter just as much once you’ve lowered the truck and added wider tires. A stock manual steering box feels heavy even before modifications; add wider rubber and a slammed stance, and parking lot maneuvers become a workout. Power steering conversion kits, or a rack-and-pinion swap for builders chasing sharper handling, solve this directly.
- Convert to front disc brakes first if your build only allows one brake upgrade this year.
- Add rear disc brakes if you’re increasing power meaningfully or plan to tow.
- Match your master cylinder bore size to your new brake setup, not the original spec.
- Install an adjustable proportioning valve to correct brake bias after any brake upgrade.
- Upgrade to power steering, or a rack conversion, once you’ve lowered the truck or added wider tires.
- Lowered trucks often need shorter brake lines or braided replacements to avoid overextension at full suspension droop.
- Larger front rotors may require spacers or specific wheel offsets to clear calipers, so confirm before ordering wheels.
- Power steering pump brackets differ between original small-block and LS-swapped engines.
What Wheel and Tire Sizes Fit a 1970 C10 Without Rubbing?
Wheel and tire choices depend entirely on your suspension path, and getting backspacing wrong is the fastest way to turn a good-looking build into a rubbing, scraping mess. Backspacing measures the distance from the wheel’s mounting surface to the back edge of the rim, and it determines how far the tire tucks toward your brake calipers and steering components versus how far it pokes toward the fender.
For a street restomod riding on coilovers, an 18 by 9 inch front wheel with 4.5 to 5 inches of backspacing generally clears factory-style disc brake calipers, paired with a 245/45R18 tire for a balanced, filled-out look. A lowered show truck running air ride typically goes wider and lower profile, often 20 by 10 inch wheels with a 275/35R20 tire, but that combination demands careful backspacing checks against control arm and frame clearance at ride height. A mild off-road or daily-driver build usually keeps closer to stock sizing, something like a 17 by 8 inch wheel with a 265/70R17 tire, prioritizing sidewall height for comfort and ground clearance over aggressive stance.
| Build Type | Wheel Size | Tire Size | Backspacing Range |
|---|---|---|---|
| Street restomod | 18x9 | 245/45R18 | 4.5 inches |
| Lowered show truck | 20x10 | 275/35R20 | 5.0 inches |
| Mild off-road/daily | 17x8 | 265/70R17 | 4.5 inches |
- Always check backspacing against your specific brake caliper width, not just a general C10 fitment chart.
- Confirm steering linkage clearance at full lock, especially on lowered trucks with wider wheels.
- Verify tire load ratings match your truck’s actual weight, especially if you’ve added a heavier LS engine up front.
- Short-bed C10s generally have slightly less rear wheel well clearance than long-bed versions, so confirm fitment against your specific bed length.
Rubbing at full steering lock or at the top of suspension travel almost always traces back to backspacing that’s too aggressive for the chosen tire width, not the wheel diameter itself.
Which Exhaust and Intake Setup Fits Your Engine Choice?
Header selection depends heavily on which engine you’ve chosen and how much fabrication you’re willing to accept. Long-tube headers deliver noticeably better performance, especially at higher RPM, but they’re also the most likely to interfere with the steering box, brake booster, and oil pan on a C10 chassis. Shorty headers sacrifice some top-end power for dramatically easier installation and far fewer clearance headaches, which makes them the practical choice for most street-driven builds.
The most common interference points show up in predictable places: the steering box on the driver’s side, the brake booster near the firewall, and the oil pan sump depending on which pan you’ve chosen for your LS swap. Confirming header compatibility with your specific oil pan and steering setup before purchase saves a frustrating return process later.
Pipe diameter should scale with your power level. A mild 5.3L swap in the 300 to 350 horsepower range works well with 2.5 inch exhaust piping, while builds pushing past 400 horsepower benefit from stepping up to 3 inch piping to reduce backpressure. Exhaust diameter affects more than raw output, too; it shapes the exhaust note and the perceived aggressiveness of the build, which matters if sound is part of your goal.
Pro Tip: Order your headers only after you’ve confirmed your oil pan and steering box combination. Header return rates for C10 LS swaps are disproportionately high, and almost all of them trace back to a clearance conflict that a five-minute measurement would have caught.
- Catalytic converters: Street-legal builds need them to stay compliant; track-only builds can skip them for a small power gain, but check your local laws first.
- Muffler selection: Chambered mufflers deliver a deeper, more aggressive tone; straight-through designs sound louder and more raw at higher RPM.
- Pipe routing: Dual exhaust systems need careful routing around the rear axle and fuel tank on a C10 frame.
What Cooling, Fuel, and Wiring Upgrades Does Higher Power Require?
Factory cooling and fuel systems on a 1970 C10 were engineered for a low-compression small-block making a fraction of the power most restomod builds target today. Expect to replace both when you increase output significantly. A larger aluminum radiator paired with dual electric fans handles LS-level heat loads far better than the factory setup, which is a near-universal requirement once you move beyond a mild factory-spec engine.
Fuel delivery matters just as much. The factory in-tank mechanical pump can’t supply the pressure or volume that an LS engine’s fuel injection system demands. Most builders upgrade to an in-tank high-pressure electric pump designed for EFI applications, then run new hard lines from the tank forward. You’ll also decide between a return and returnless fuel system, a choice that affects regulator placement and line routing. Budget for this as its own line item; experienced builders consistently report that fuel system costs get underestimated in swap budgets, since the pump, lines, fittings, and regulator add up faster than expected.
Wiring deserves the same attention as the engine itself. A stock 1970 harness wasn’t designed for modern electronics, fuel injection, or the additional accessories most restomods carry. A dedicated harness kit, like the options Ozkonic Kustomz carries through its wiring harness product line, replaces brittle factory wiring with color-coded, properly fused circuits that make diagnosing electrical gremlins dramatically easier down the road. American Autowire is another widely recognized name in this space, offering harness kits built specifically around classic truck wiring layouts.
- Install dual electric fans with a wiring relay and adjustable thermostat controller rather than relying on a single fan for LS-level cooling loads.
- Route new fuel lines away from exhaust heat sources and secure them with high-quality clamps every 12 to 18 inches.
- Choose a harness kit rated for your specific accessory count, since adding aftermarket gauges or lighting later can overload an undersized harness.
Pro Tip: Label every wire during removal of the old harness, even if you’re installing a new one. You’ll thank yourself when troubleshooting an accessory circuit six months from now.
How Do You Modernize Your C10’s Interior and Exterior Without Losing Value?
Cosmetic upgrades don’t affect drivability, but they’re often what makes a build feel finished. The parts list here is short but impactful: modern gauge clusters that retain a classic look, LED headlights and taillights for dramatically better visibility, restored or reproduction grilles and bumpers, upgraded seats for long-drive comfort, and upholstery that matches your build’s overall theme.
A modest restomod might keep the original bench seat but reupholster it in a modern material, add LED lighting for safety, and swap in a gauge cluster with better accuracy while keeping the factory dash intact. A full show truck build goes further: bucket seats, a completely custom interior, chrome-restored bumpers and trim, and a paint job that matches or complements the wheel and stance choices made earlier in the build.
Chrome trim restoration deserves special mention, since original bumpers and grilles on a 1970 C10 are frequently pitted or faded beyond a simple polish. Professional chrome restoration processes can bring severely degraded trim back to a show-quality finish, and understanding the different restoration methods available helps you budget accurately before committing to a full re-chrome versus a partial repair.
The 1967 to 1972 C10 models have entered muscle-car valuation territory in recent years, meaning resale expectations for these trucks now depend equally on build quality and originality-adjacent details as on raw performance numbers.
That shift changes the calculus on what to modify and what to preserve. Original trim in good condition, matching-numbers components, and factory paint codes all carry more resale weight than they did a decade ago. If resale value matters to your build, document everything you replace and keep original parts in storage rather than discarding them.
What Does a Realistic Budget and Timeline Look Like?
Budgeting a 1970 Chevy C10 restomod comes down to breaking the build into packages rather than treating it as one massive expense. A suspension-only upgrade, coilovers plus basic alignment work, typically runs $1,500 to $3,500 DIY or $3,000 to $6,000 through a shop. A brake-and-wheel package, front disc conversion plus a wheel and tire set, generally lands between $2,500 and $5,000 depending on wheel choice. A budget LS swap, as covered earlier, runs $4,000 to $6,000 DIY or $8,000 to $12,000 through a shop. A full restomod combining all of the above, plus cosmetic work, commonly reaches $20,000 to $40,000 or more depending on how far you take the interior and paint.
1970 C10 valuation data indicates a broad market range reflecting varied conditions, with median prices aligning around the middle of typical sales today. That range gives you a useful ceiling check: spending $40,000 on upgrades for a truck worth $19,495 stock only makes sense if you’re building for personal enjoyment, not resale return. Hagerty’s valuation tools offer configuration-specific pricing if you want to compare your exact trim and condition against recent sales.
- Start with structural inspection and repairs, since everything else depends on a sound frame and cab.
- Move to suspension and brakes together, since they’re interdependent for safety and handling.
- Tackle the engine swap once suspension and brakes are finalized, so you’re not fighting clearance issues twice.
- Handle wiring and cooling upgrades alongside the engine swap, since they’re most efficient done together.
- Finish with cosmetic work, interior, exterior trim, and paint, once everything mechanical is proven reliable.
Timeline expectations vary widely by scope. A weekend warrior can knock out a suspension upgrade or a brake conversion in two to three days. A full LS swap with supporting systems typically takes two to four weekends for an experienced DIYer, or one to two weeks in a shop with dedicated bay time. Full restomods commonly stretch three to six months when you factor in fabrication work, paint curing time, and wiring harness installation, since these three steps create the most scheduling delays in any build.
Phasing your build across a year or two, rather than trying to do everything at once, spreads the cost and keeps the truck drivable between upgrade stages.
How Do You Confirm Fitment Before Ordering Parts?
Ordering the wrong year-specific kit is the most common and most expensive mistake in any C10 build. Before you click “buy,” work through this checklist:
- Confirm your exact chassis year via VIN decode, since 1967 to 1972 C10s share a body style but not every underlying dimension.
- Identify your steering box location and type (manual or power) before ordering any suspension or engine mount kit.
- Measure front crossmember clearance if you’re planning an LS swap, since crossmember shape changed subtly across model years.
- Determine your oil pan sump type requirement based on your chosen engine and steering geometry.
- Measure transmission tailshaft length if you’re changing transmissions, since driveshaft length depends directly on this dimension.
When you contact a parts vendor, ask specific questions rather than general ones: does this kit fit my exact VIN-decoded chassis year, what oil pan does this mount kit require, and does this header design clear a power steering box versus a manual one. Supply clear photos of your frame rail, steering box mounting area, and engine bay when possible, since a vendor’s technical support team can often catch a fitment conflict from photos that a written description misses.
- If fitment is unclear, measure the actual physical dimension yourself rather than trusting a generic listing description.
- Cross-reference part numbers against a fitment diagram specific to your truck’s production date, not just the model year range.
- Use vendor tech support before ordering, especially for LS swap components, since a five-minute phone call can prevent a costly return.
Ozkonic Kustomz backs its parts with fitment support specifically because generic “fits 67 to 72” listings cause so many of these problems industry-wide.
What Do Experienced Builders Say About LS Swap Clearance Issues?
Builders who’ve done multiple LS swaps consistently point to the same handful of clearance checks that separate a clean install from a frustrating one. The single biggest theme across swap guides and community forums is fitment-first thinking: measure before you buy, not after.
| Clearance Point | What to Check | Why It Matters |
|---|---|---|
| Oil pan sump | Rear-sump or dedicated swap pan matched to truck year | Prevents crossmember and steering conflicts |
| Header routing | Clearance around steering shaft and brake booster | Avoids costly header returns and modifications |
| Mount kit compatibility | Year-specific engine mount kit, not generic listing | Ensures proper engine placement and alignment |
| Transmission crossmember | Measured after full drivetrain mock-up | Prevents driveshaft length errors |
The oil pan issue deserves particular attention because it’s rarely optional. A rear-sump or dedicated swap pan designed specifically for your truck year and steering geometry avoids the crossmember and steering conflicts that catch first-time swappers off guard. Skipping this step and using a generic pan is one of the most common and most expensive mistakes in the entire swap process.
Underbudgeting the fuel system ranks as the second most common pitfall. Builders consistently underestimate how much the pump, lines, fittings, and regulator add up, since these components rarely get their own line item in initial budget planning. The same goes for cooling: assuming the factory radiator will “probably be fine” almost always ends in an overheating truck within the first hot summer of driving.
- Confirm oil pan sump type before ordering any mount kit.
- Check header clearance around the steering shaft and brake booster before finalizing your exhaust plan.
- Measure transmission crossmember position only after full drivetrain mock-up.
- Budget the fuel system as its own category, not a footnote under “engine costs.”
- Add radiator and fan upgrades to your initial budget, not as an afterthought once overheating starts.
Pro Tip: Do a full dry mock-up of the engine, transmission, and exhaust before you weld, bolt, or wire anything permanently. The hour you spend test-fitting saves the weekend you’d otherwise spend un-installing something that doesn’t clear.
For deeper part-by-part guidance, Ozkonic Kustomz’s LS engine swap fitment checklist walks through these exact clearance points in more mechanical detail.
Why Suspension and Frame Work Should Come Before Horsepower
Frame and suspension work has to come before power increases, not after, because a truck that flexes, sags, or wanders under load will never handle the horsepower you’re planning to add. Adding 300 extra horsepower to a chassis with worn bushings and sagging leaf springs doesn’t create a fast truck. It creates a scary one.
For three common build goals, here’s how sequencing should look. A daily driver benefits most from coilovers, a disc brake conversion, and a mild 5.3L swap, in that order, since reliability and predictable handling matter more than peak output. A restomod build should follow the same suspension and brake sequence, then invest more heavily in the engine and cosmetic finish once the foundation is proven solid. A show truck build can actually flip the priority somewhat, since a stock-appearing suspension with hidden air-ride components often scores better than an obviously modified one, but brakes and steering upgrades still need to happen regardless of how the suspension looks.
One more thing worth remembering: document everything. Keep receipts, part numbers, and before-and-after photos of every stage. Given how second-generation C10 values have climbed into muscle-car territory, a well-documented build history matters more to a future buyer than it did a decade ago, and it costs you nothing but a folder and a phone camera.
Where to Buy Fitment-Guaranteed Parts for Your 1970 C10
Every upgrade covered here, from wiring to suspension to fittings, only delivers real value when the parts actually fit your truck. That’s the gap Ozkonic Kustomz was built to close. Rather than gambling on a generic “67 to 72 fitment” listing and hoping for the best, Ozkonic Kustomz sources directly from vetted manufacturers and backs every part with fitment support, so you’re not stuck troubleshooting a clearance conflict after the parts already arrived.
If wiring is next on your list, the Highway 22 modular wiring kit gives you the same clean, color-coded harness upgrade discussed earlier in this guide, built for a truck-mount installation that simplifies the swap. For builders moving toward air ride, the Air Lift rear kit covers the compressor and bag hardware needed for a 1/2 ton to 3/4 ton conversion. And for the fuel and brake line plumbing that so many swap budgets underestimate, a swivel fitting built to the right thread and AN spec saves you a second trip to the parts counter.
Not sure which kit matches your exact chassis year or engine combination? Reach out to Ozkonic Kustomz’s technical support team before you order, get your fitment confirmed, and take advantage of straightforward returns if anything still doesn’t line up once it’s in your hands.
Sources
- 1970 Chevrolet C10 Value (2026) — Real Market Data | Classic Cars Arena
- 1970 Chevrolet C10 configurations | Hagerty Valuation Tools
- Wilwood: Chevy C10 brake solutions
Recommended
- C10 LS Swap Parts: Complete Squarebody Build Guide – Ozkonic Kustomz LLC
- LS Engine Swap Guide: Fitment-First Checklist for DIYers – Ozkonic Kustomz LLC
- Truck Restoration Tips for Performance Builders – Ozkonic Kustomz LLC
- Header Installation Guide: Boosting Performance on Your Small Block Ch – Ozkonic Kustomz LLC