Yes, bedding new brake pads is necessary, and skipping it is the most common reason DIY brake jobs end up with a shudder in the pedal. The process transfers a thin, even layer of pad material onto the rotor through a controlled series of progressive stops, followed by a cool-down drive. Budget 20 to 45 minutes for the full session, and follow the step sequence below before you drive normally, which generally requires up to about 45 minutes.
TL;DR:
- Proper bedding is essential for new brake pads, especially when switching pads or rotors, to prevent judder, pulsing, and uneven wear.
- The standard street bedding process involves multiple moderate-speed stops with cool-down intervals, avoiding high-speed or emergency braking.
- Achieving an even, light gray transfer layer on the rotor and a steady pedal feel in test drives indicate correct bedding.
- Performance pads require higher rotor temperatures and steeper deceleration routines, with proper temperature control critical to avoid glaze or resin damage.
- Using verified, properly matched parts from reputable sources reduces bedding failures and improves overall brake system performance.
Table of Contents
- What Is Brake Pad Bedding and Why Does It Matter?
- Do You Actually Need to Bed These Brakes Right Now?
- How to Bed New Brake Pads on Public Roads
- What Changes for Track or Performance Pad Bedding?
- How Do You Know If Your Brakes Are Bedded Correctly?
- Common Bedding Mistakes and How to Fix Them
- Get the Fitment Right Before You Even Start Bedding
- How Pros Approach Bedding Differently
- Ozkonic Kustomz: Verified Fitment Means Fewer Bedding Failures
- Sources
- FAQ
What Is Brake Pad Bedding and Why Does It Matter?
Brake pad bedding, also called break-in or conditioning, is the process of depositing a thin, even film of pad material onto the rotor face. That film, known as the transfer layer, becomes the actual surface your pads grip every time you brake afterward, not the bare rotor iron.
There are two ways friction happens at that interface: abrasive, where the pad essentially grinds against raw metal, and adherent, where the pad bonds to its own transferred material. Adherent friction is smoother, quieter, and far gentler on rotor wear. Centric’s technical bulletin identifies an even transfer layer as the main goal of bedding, and notes that thickness variation in that layer is the leading cause of brake judder.
Skip the process and you risk glazing (a hardened, slick pad surface that barely grips), patchy or splotchy transfer, and a pedal that pulses under braking. None of that shows up on day one. It shows up three weeks later, usually on the highway.
Do You Actually Need to Bed These Brakes Right Now?
A few scenarios make bedding non-negotiable. Fresh pads paired with new or resurfaced rotors need it every time. So does switching to a different pad compound, even on rotors that already have miles on them. If no installer road-tested the vehicle after the brake job, that responsibility falls to you.
There are exceptions. Some shops dyno-bed brakes before the car ever leaves the lot, and a handful of pre-bedded performance components arrive with the transfer layer already established. In either case, a full street procedure is redundant.
One safety note that overrides everything else: never attempt progressive stops in traffic, in a school zone, or anywhere the speeds involved would be illegal or unsafe. Find an empty stretch of road first.
How to Bed New Brake Pads on Public Roads
This is the standard procedure for street pads on rotors that haven’t seen a rotor resurfacing shop lately.
Before you start:
- Torque the wheels to spec and confirm there’s no play in the lug nuts.
- Check brake fluid level and inspect lines for leaks.
- Pick a quiet stretch of road with no traffic, stoplights, or pedestrians nearby.
The bedding sequence:
- Accelerate to 40 to 50 mph, then brake firmly (not a full panic stop) down to about 5 to 10 mph.
- Let the vehicle roll and accelerate again immediately. Do not hold the pedal at a stop.
- Repeat this stop for a set of 6 to 8 cycles, giving the brakes a brief moment to breathe between each one.
- StopTech’s recommended procedure calls for two full sets of partial braking events with a cooling interval between sets, and for most street-performance pads, two sets are enough.
- After the final set, drive normally for 5 to 10 minutes with minimal braking to complete the cool-down.
Les Schwab’s guide uses a similar pattern, warming with several cycles from moderate to low speeds before a few harder stops, followed by a cool-down period. Either version works. What matters is progressive heat, brief rest between stops, and a real cool-down before you park. For the next 500 to 1,000 miles, avoid hard, sustained braking so the transfer layer has time to fully cure.
What Changes for Track or Performance Pad Bedding?
Performance pads run hotter, and they need it. Vehiclebar’s bedding guide notes that race compounds often require rotor surface temperatures in the several-hundred-to-over-a-thousand-degree range to transfer material properly, compared to street pads. That means steeper decelerations and less mercy between stops.
Wilwood’s competition sequence, one of the more widely cited manufacturer procedures, works in three stages:
- A progressive warm-up phase using light, gentle stops to bring temperatures up gradually.
- A middle phase of medium-to-firm decelerations that builds heat without overloading the system.
- A finishing phase of several hard decelerations, typically from 55 to 65 mph down to 25 mph, per Wilwood’s published bedding steps.
Wilwood is explicit that contact surfaces should never touch brake fluid or contaminants during this process, since even trace contamination ruins the transfer layer you’re trying to build.
Stop immediately if you see smoke, smell anything burning, or feel the pedal go long or soft. That’s fade, and continuing risks boiling your fluid. If you can’t safely reach the temperatures a race compound needs on public roads, a shop-based dyno-bedding session is the smarter move.
Pro Tip: Performance pads are picky in both directions. Under-heat them and you get zero transfer; overheat them and you get glazing or resin breakdown. There’s a real window, and guessing at it on the street is how expensive pads get ruined in one afternoon.
How Do You Know If Your Brakes Are Bedded Correctly?
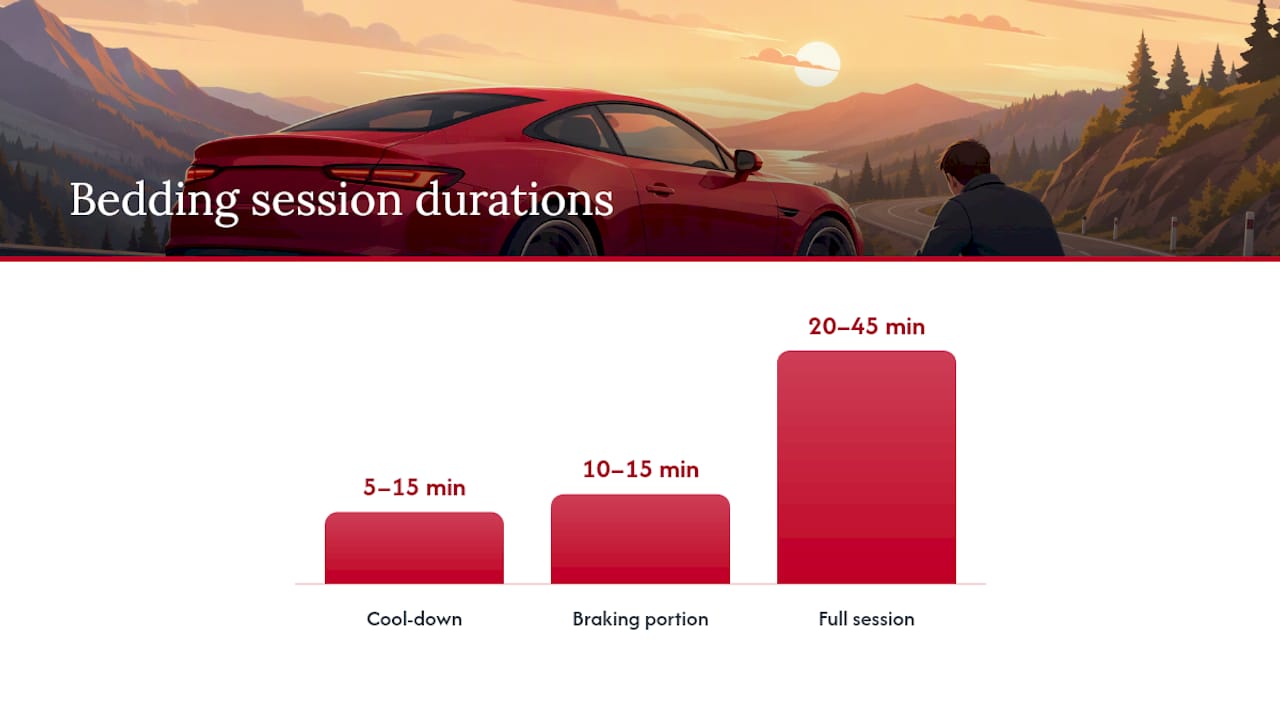
The cool-down is not optional, and it is not a formality. Drive at moderate speed for 5 to 15 minutes with minimal braking after your final hard stop, and let the rotors cool fully before you park, if your route allows it. Parking immediately on hot brakes is one of the fastest ways to warp a rotor you just paid for.
Once things have cooled, pull a wheel or use a flashlight through the spokes and check for these signs:
- An even, light gray film across the entire swept area of the rotor face.
- No dark blue splotches, which usually mean localized overheating.
- No shiny, bare metal patches where transfer never took.
On the road, bedding whitepapers point to a steady, consistent pedal with no pulsing as the real functional test. Take a few short test drives afterward and pay attention to how the pedal feels under normal stops. A full bedding session, start to finish, typically runs 20 to 45 minutes depending on pad type, with the actual braking portion usually taking 10 to 15 minutes of that.
Common Bedding Mistakes and How to Fix Them
Most bedding failures trace back to a handful of repeat offenders:
- Parking on hot brakes right after the final stop, which locks in uneven cooling and can warp a rotor.
- Rushing the cool-down or skipping it entirely to save five minutes.
- Mismatching a performance pad compound with rotors that aren’t rated for the heat it generates.
If you end up with patchy transfer or a pulsing pedal, you have options short of buying new parts. A repeat controlled bedding session sometimes corrects light glazing. Persistent hot spots may mean the rotor needs resurfacing, since excess heat can actually alter rotor metallurgy and create hard spots that no amount of re-bedding will fix. If diagnostics point to fade or fluid issues rather than a bad transfer layer, our guide on fixing brake fade walks through the recovery steps.
Stop the moment you smell burning, see smoke, or feel anything strange from the ABS system. None of that is normal, and continuing to drive on it turns a bedding problem into a safety problem.
Get the Fitment Right Before You Even Start Bedding
Bad bedding results usually trace back to bad parts, not bad technique. Before you bed anything, confirm the pad compound actually matches your driving use, verify the rotors are the correct fitment for your vehicle, and check that mounting hardware is properly torqued.
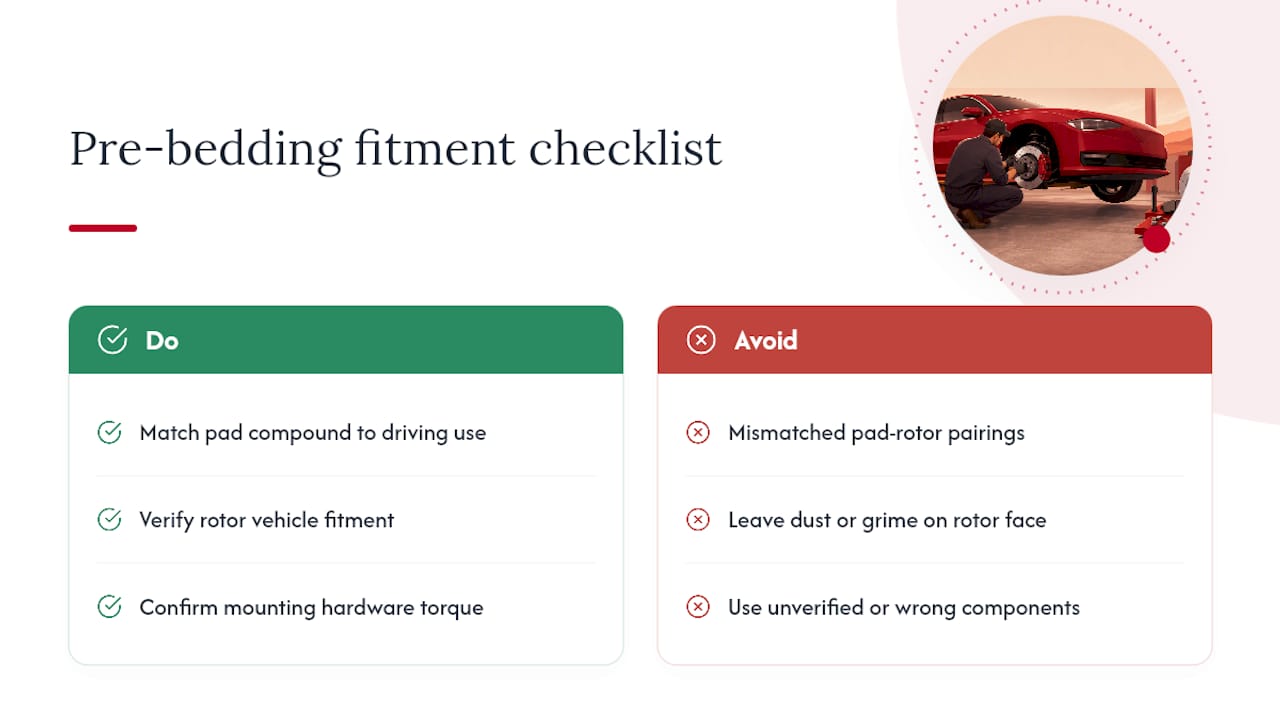
Mismatched pad-rotor pairings are a quiet cause of patchy transfer and accelerated wear that no bedding procedure can fully correct. Sourcing verified components cuts that risk out of the equation before it starts. Our guide to choosing the right brake pads covers compound selection, and our rotor guide on buying the metal, not the pattern covers what actually matters in rotor prep. Keep dust and grime off the rotor face during install, too. A proper brake dust removal method with a short dwell time keeps contaminants from interfering with your first bedding session.
How Pros Approach Bedding Differently
Shops often road-test after a brake job, or dyno-bed the vehicle before it leaves, precisely so the owner never has to attempt risky high-speed stops on unfamiliar roads. That call makes sense when there’s no safe stretch nearby, when track-oriented components are involved, or when cooling demands get complicated. Pre-bedded parts save time and cut the margin for error considerably.
**
Ozkonic Kustomz: Verified Fitment Means Fewer Bedding Failures
A bad transfer layer is often a symptom of a bad part, not a bad procedure. Sourcing brake pads and rotors directly from vetted manufacturers can help reduce compatibility issues that cause patchy transfer, uneven wear, or counterfeit-part failures.

Every pairing in our Brakes & Brake Systems collection is checked for fitment against your specific vehicle, backed by expert support if you’re unsure which compound fits your driving style. Pair that with our guides on pad selection and rotor prep, and you’re bedding parts that were correct from the start. If you’re not sure which pads or rotors fit your build, reach out to our support team before you check out. Browse the Brakes & Brake Systems collection and confirm compatibility for your vehicle today.
Sources
- TECH_BULLETIN_C22-01.pdf (Centric Parts technical bulletin)
- Pad and Rotor Bedding Steps (Wilwood)
- How to Bed-In or Condition New Brake Pads and Rotors (Les Schwab)
FAQ
Is Brake Pad Bedding Necessary?
Yes. Skipping it leaves the pad grinding against bare rotor metal instead of bonding to its own transfer layer, which Centric’s technical bulletin identifies as the leading cause of judder and vibration. New pads, new or resurfaced rotors, and any change in pad compound all call for a proper bedding session.
How Do You Know If Your Brakes Are Bedded?
Look for an even, light gray film across the full swept area of the rotor, with no dark blueing or shiny bare patches. Functionally, the pedal should feel steady and consistent under braking with no pulsing, confirmed over a few short test drives.
Do Pads Need to Be Bedded Again After Changing Rotors?
Yes. A fresh rotor surface has no transfer layer on it at all, so even pads that were already bedded on the old rotors need to go through the full procedure again on the new surface.
What Is Bedding In New Brake Pads?
Bedding in is a controlled series of progressive stops and a cool-down drive that deposits an even layer of pad material onto the rotor face. That layer, called the transfer layer, becomes the surface your brakes actually grip going forward, and the whole session typically takes 20 to 45 minutes.