For most enthusiast builds, a Stage 2 kit with verified fitment beats a random online purchase every time, and Ozkonic Kustomz is the sourcing route we recommend because it checks compatibility before the part ships. Daily drivers do best with an OEM-style or Stage 1 organic disc, mixed street/track builds usually land on Kevlar or ceramic-organic hybrids, and dedicated track or heavy-tow rigs justify a sintered or multi-disc setup. Buy the full kit, not just the disc, and confirm your flywheel situation before checkout.
TL;DR:
- A verified fitment Stage 2 kit from a reputable source like Ozkonic Kustomz ensures compatibility and prevents costly installation errors.
- Daily drivers should stick to OEM-style or Stage 1 organic clutches, while performance builds need Kevlar, ceramic, or multi-disc setups for higher torque handling.
- Proper flywheel condition and matching the clutch’s torque and heat capacity are vital for reliable operation and long-term service life.
- Confirm drivetrain specifics, torque needs, and kit contents before purchase, and avoid reusing torque-to-yield bolts to prevent failure.
- Bedding and inspecting the clutch during the first 500 miles enhances reliability, and verification of fitment prior to ordering reduces the risk of mismatched parts.
Table of Contents
- Best Clutches by Application: What Actually Fits Your Build
- How Do You Choose the Right Clutch Kit for Your Vehicle?
- Clutch Materials and Stages: What Each One Actually Feels Like
- What to Buy Alongside a New Clutch Kit
- Why Moment of Inertia Matters More Than You’d Think
- How to Break In and Maintain a New Clutch
- Why Fitment Verification Beats Guesswork Every Time
- Get the Right Clutch Kit Shipped With Fitment Already Verified
- Sources
- FAQ
Best Clutches by Application: What Actually Fits Your Build
Picking the right clutch isn’t about grabbing the most aggressive disc on the shelf. It’s about matching torque capacity, heat tolerance, and pedal feel to how the vehicle actually gets driven. Here’s how the picks break down by use case.
- Recommended pick: a complete kit sourced from a manufacturer with fitment verified against your VIN and drivetrain specs before it ships. This matters because a mismatched spline count or bellhousing pattern turns a weekend job into a return shipment and a second transmission drop.
- Daily-driven pick: OEM-style or Stage 1 organic. These discs deliver the smoothest engagement, the quietest operation, and a service life that often matches the factory unit when driven normally. If your build hasn’t added meaningful torque, there’s no reason to pay for more clutch than the engine needs.
- Mild-to-moderate performance pick: Stage 2, built around Kevlar or a ceramic-organic hybrid blend. These give you real torque margin over stock without turning the pedal into a workout, though expect slightly firmer engagement and a bit more noise under load, a trade performance kits generally require compared to OEM parts.
- Heavy-duty and track pick: multi-disc or sintered/carbon setups. These hold serious torque and survive repeated hard launches, but the engagement is abrupt and daily comfort takes a back seat. Save this tier for builds that actually see the track or a dyno regularly.
Flywheel choice rides along with every one of these decisions. A worn or heat-scarred stock flywheel needs resurfacing at minimum, and if you’re already stepping up to Stage 2 or higher, a lightweight or matched-mass flywheel usually makes more sense than resurfacing a heavier stock unit, especially for track-focused builds where consistent engagement and heat management pay off.
How Do You Choose the Right Clutch Kit for Your Vehicle?
Before you add anything to a cart, run through this checklist. It takes ten minutes and it’s the difference between a clean install and a redo.
- Confirm VIN-level fitment. Engine code, transmission type, and bellhousing pattern all matter, not just the make and model year.
- Know your torque number. Measured dyno torque beats a guess, but even a planned torque target from your build sheet is better than nothing.
- Decide your repair scope. Are you doing a minimum refresh, a same-access upgrade while the transmission’s already out, or a do-it-once reset that assumes you never want to touch this again?
- Verify kit contents. Disc, pressure plate, release bearing, pilot bearing or alignment tool, and whether a flywheel is included. Many aftermarket and OEM kits vary widely here, so don’t assume.
- Ask the seller four questions. How is fitment verified? What’s the torque rating? What’s the published operating temperature range? What’s the warranty and return policy if something doesn’t match?
Pro Tip: Never reuse torque-to-yield bolts on the pressure plate or flywheel. They’re designed to stretch once during tightening, and reusing them risks an under-torqued bolt backing out under load, which is a preventable failure that costs way more than a new bolt kit.
The mistake we see most often is buyers skipping the flywheel line item entirely, assuming the old one is fine, then discovering chatter or slippage within a few hundred miles because the resurfaced or heat-damaged flywheel couldn’t mate properly with the new disc.
Clutch Materials and Stages: What Each One Actually Feels Like
Material choice changes how the car drives more than almost any other spec on the kit.
- Organic: the smoothest engagement, quietest operation, easiest on the flywheel, but the lowest heat tolerance and torque ceiling of the group.
- Kevlar: holds friction consistently as temperatures climb, engaging more smoothly than ceramic while still handling a meaningful torque bump, which is why it’s a common pick for street-driven performance builds, per comparisons of Kevlar and ceramic compounds.
- Ceramic/cerametallic: high grip and strong torque capacity for boosted or high-power builds, but the engagement is abrupt and it wears mating surfaces faster, a trade worth making only when repeated hard launches matter more than daily comfort.
- Sintered/carbon: the highest torque capacity in the lineup, built for repeated abuse, with engagement and NVH characteristics that make it a poor daily-driver choice.
Stage 1 sits closest to stock behavior with a modest torque bump. Stage 2 adds real margin for moderate power builds. Stage 3 and above start trading drivability for capacity, which is exactly why dual-disc or hybrid setups often balance the two better than a single aggressive race disc for anyone splitting time between street and track.
What to Buy Alongside a New Clutch Kit
The transmission removal is the expensive part of this job, not the parts themselves, so replacing every adjacent wear item while it’s out is almost always the smart move rather than paying for labor twice.
- Rear main seal and transmission input shaft seal
- Pilot bearing or bushing, plus a fresh alignment tool
- Release bearing, and slave/master cylinder if your platform uses a hydraulic setup
- New transmission fluid, and a flywheel or flywheel resurfacing
- New torque-to-yield bolts where the pressure plate or flywheel calls for them
Before ordering, double-check spline count, disc diameter, and bellhousing compatibility against your exact drivetrain, whether that’s a manual RWD truck, an AWD platform, or a swapped combination. Some platforms run concentric slave cylinders built into the transmission bearing retainer, and those need a specific kit variant. If you’re mapping out the rest of a build’s upgrade order, our guide to sequencing performance parts walks through where the clutch fits relative to everything else.
Why Moment of Inertia Matters More Than You’d Think
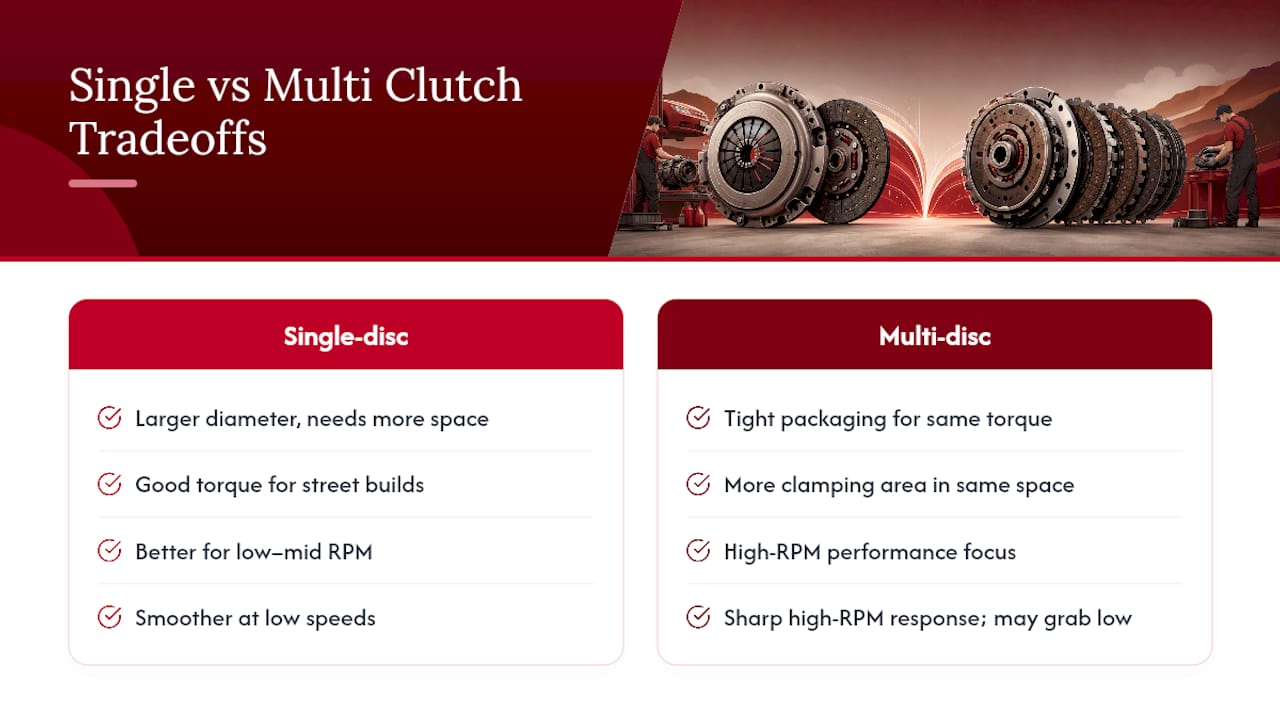
Moment of inertia, or MOI, describes how hard it is to change a spinning object’s speed, and for a clutch assembly, where the mass sits matters more than how much it weighs overall. A smaller-diameter disc with mass concentrated near the center spins up and down faster than a larger, heavier assembly, which is why reducing rotating mass improves throttle response and cuts synchronizer wear at high RPM.
The trade-off: a lighter, smaller-diameter setup that shifts great at 6,000 RPM can feel grabby or unpredictable at parking-lot speeds if it isn’t matched properly to the vehicle. Multi-disc setups solve the space problem for high-torque applications, since you get more clamping area without the diameter increase a single-disc setup would need. Whichever direction you go, confirm assembly mass specs and follow the manufacturer’s air-gap setting exactly. It’s tied directly to gearing and launch behavior, so it’s worth reviewing alongside your differential and gear ratio choices rather than in isolation.
Pro Tip: If you’re torn between a multi-disc setup and a larger single-disc, let available bellhousing space and target RPM range make the call. Multi-disc wins for tight packaging and high-RPM applications; a larger single-disc keeps things simpler for torque-focused street builds that never see redline for long.
How to Break In and Maintain a New Clutch
Bedding a new clutch right sets the tone for its entire service life. Most manufacturers recommend a gentle 300 to 500 mile break-in window, avoiding hard launches or prolonged slipping during that stretch.
- Drive normally for the first few hundred miles, avoiding aggressive clutch dumps or holding the pedal at the friction point.
- Watch for chatter when cold, slipping under load, grabbing on engagement, or pedal travel that feels different from day one. Any of those point to a setup issue or a bad break-in.
- Inspect the release system periodically. Check for hydraulic leaks at the slave or master cylinder, and reassess the flywheel surface any time you replace the disc again.
- Log any power or torque increases to your build. If you add a turbo upgrade or bump boost meaningfully, that’s your cue to revisit clutch capacity before it becomes a slipping problem.
A structured preventive maintenance habit rather than a reactive one catches release-bearing wear and hydraulic leaks long before they cause a roadside failure.
Why Fitment Verification Beats Guesswork Every Time
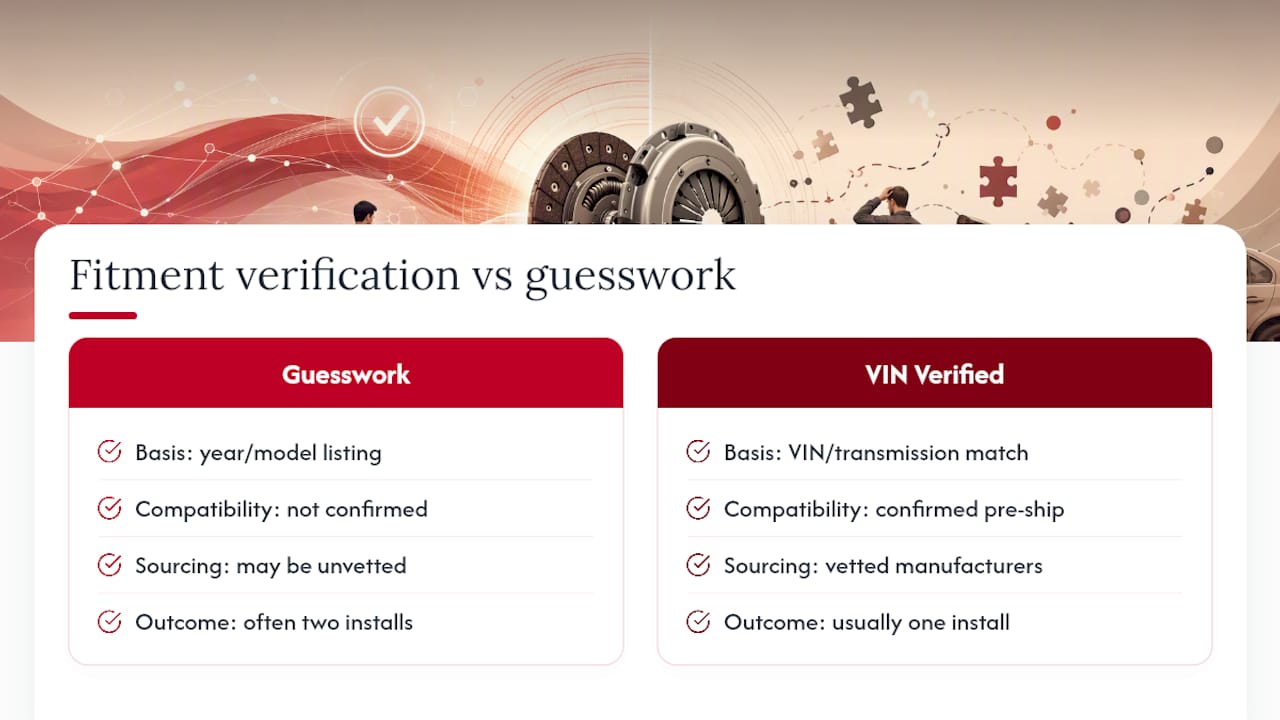
Every clutch failure story we’ve heard traces back to the same root cause: someone bought a part based on a year and model listing instead of confirming actual fitment against their transmission and engine combination. That’s the gap between what most online listings promise and what a builder actually needs before dropping a transmission.
Sourcing from vetted manufacturers and verifying compatibility before shipping isn’t a nice bonus. It’s the difference between one install and two. Fast shipping and a straightforward return policy matter too, but only after the part actually fits the vehicle in front of you.
— Ozkonic Kustomz
Get the Right Clutch Kit Shipped With Fitment Already Verified
Fitment is checked before the kit ships, not after you’ve already dropped the transmission. That’s the real advantage over guessing from a generic parts listing: every clutch kit sourced comes from manufacturers, cross-checked against vehicle specs, so you’re not stuck return-shipping a mismatched disc or discovering a wrong bellhousing pattern mid-install.
If you’re already planning the rest of the driveline work, browse our suspension and chassis parts or exhaust systems to round out the build while the transmission’s out. Not sure which stage or material fits your torque numbers? Reach out to our support team and verify fitment before you buy, not after.
Sources
- Clutch Kit Buying Guide: OEM vs Aftermarket vs Performance
- Carparts
- Clutch Tech: Balancing Torque & Drivability
- Performance Clutch Guide: How to Choose, Install, and Maximize Your Clutch System
FAQ
What Is the Best Clutch Type for a Daily Driver?
An OEM-style or Stage 1 organic clutch is the best fit for daily driving because it delivers smooth engagement and quiet operation without unnecessary pedal effort. Save Stage 2 and above for builds that have actually added torque.
Does a Complete Clutch Kit Include the Flywheel?
Not always. Kit contents vary between manufacturers, and many kits include a pressure plate, disc, release bearing, and pilot bearing but leave the flywheel out, so confirm this before ordering.
How Many Miles Does It Take to Break In a New Clutch?
Most manufacturers recommend a gentle break-in period of roughly 300 to 500 miles, avoiding hard launches or extended slipping during that window. Follow the specific guidance included with your kit.
Should I Upgrade My Flywheel With a New Clutch?
If you’re stepping up to Stage 2 or higher, or the vehicle sees track use, upgrading the flywheel alongside the clutch typically pays off through better heat management and more consistent engagement. For stock-level daily builds, resurfacing an undamaged flywheel is often enough.
How Does Ozkonic Kustomz Verify Clutch Fitment?
Ozkonic Kustomz sources clutch kits directly from vetted manufacturers and checks compatibility against your vehicle’s specific drivetrain details before the order ships. Pricing on individual kits is available on the site, since it varies by vehicle and kit scope.